Showing posts with label How to. Show all posts

How to Hack Facebook Account

0 comments
Facebook is the biggest and most popular online social networking service today. It has over 1.15 Billion users across the world. However along with the growing users and popularity, it is also gaining a wide attention of hackers as well.  There are many ways to hack a Facebook account. Some of them are Keylogging and Phishing and many more. However these are the general methods that are used by professional hackers. Now today I am going to show you how to hack the Facebook account of a person whose facebook name you know.

How to Hack Facebook Account


By this method you can hack the password of your friend’s (or any one) account using Facebook’s security system. Before that start you should have to create atleast 3 fake accounts on Facebook and get them add in the account of any one you want to hack. This is the msut requirement of this method and make sure you have access to all 3 fake accounts.
Now lets start to hack any friends account. :)

Step 1:

Open the web page www.Facebook.com and click on “Forgot Facebook Password” button. 

How to Hack Facebook Account


You will be presented with three options to recover the password of the Facebook account.
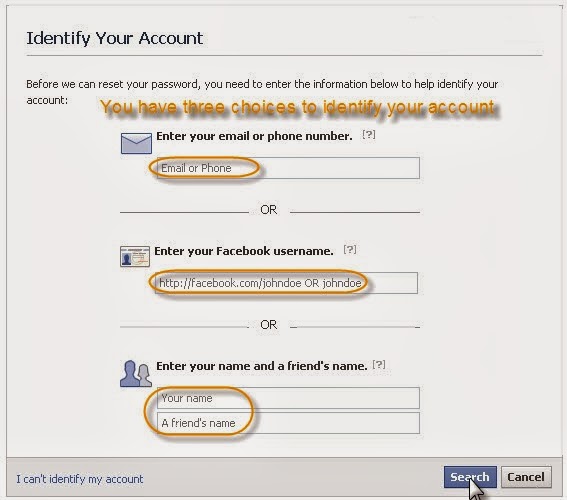

Choose any one of these options. First option needs you to fill email address of your friend whose account you want to hack. Otherwise you can choose second option by filling the username for your friend in it. Also there is third option available where you need to enter the name of the victim friend and your own name

Step2:

Next you have to click on the Search button.
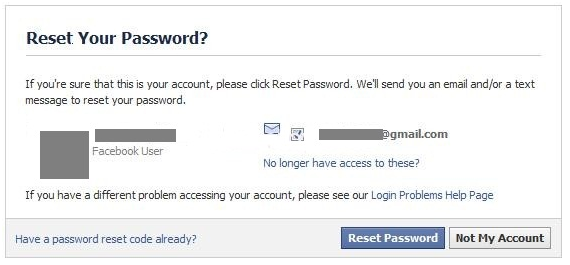
If all above steps are followed properly then you will be able to see the profile picture of your victim friend. Confirm this step by hitting “This Is My Account


Step 3:

Now the interface will show you option to recover password using the email id of your friend. You have to click on “No Longer Have Access to These” link.
How to Hack Facebook Account


Step 4:

Next enter a totally new email id in the form provided. Make sure that the email address should not be associated with some other Facebook account. click on the Submit button.


Step 5:

Now you will be provided with the option to answer the security question set up by your friend or actual owner of that Facebook Account. If you can guess the right answers to the security question then it’s a big advantage otherwise you need to enter the wrong answer for three times. After entering wrong answer for three times you will be taken to the following page.
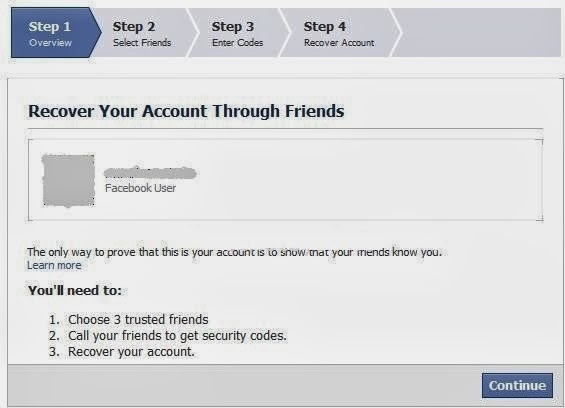


Here you need to choose the name of three friends that are on your Facebook friends list. These should be those 3 fake accounts that you have created in the very beginning. Now click on Continue button to advance to the next step.

Facebook system will send security codes to all of those three accounts chosen in previous step. Now login to each of those 3 fake accounts and get the security codes from there and get them filled in the form offered by the Facebook.


The last action taken by Facebook will be to direct a Password reset email to the new email address entered by you above from where you can reset the password and will gain complete access to your friend’s Facebook account.

Now start hacking and keep visiting CooLStack.

How to Create a Cluster (LinuxOS) - Easy Steps to create Cluster

0 comments
In my previous post of "How to Install CentOS in VMware Workstation", now I am going to write steps of "How to Create a Cluster in LinuxOS". The following are the easy steps to create a cluster but be-careful while typing commands because these are case-sensitive and also care about spaces between commands because they also matter.

Easy Steps to create Cluster


Now first make a check list of our steps as given below and we  start doing these steps...................

1: Linux Installation in Nodes
2: SSH equivalence establishment for user root
3: SSH hostkeys collection
4: Setup NTP service
5: Installation of PDSH
6: Setup NFS (Optional)
7: Creation of ordinary user, and also setup SSH equivalence for that
8: Installation of prerequisite packages (GCC, G77 etc)
9: Installation of MPI
10: Compiling Linpack (Optional)

You may also like ::: How to Install CentOS in VMware workstations


Step 1:            

Installation of Linux on all nodes

Step 2:            

Working on Master Node
Start with hosts file
Vi /etc/hosts

127.0.0.1                              localhost.localdomain localhost
10.0.0.20                              masternode
10.0.0.21                              node1
10.0.0.22                              node2

Copy Hosts file on node1 and node
For Node1
Scp /etc/hosts node1:/etc/
Are you sure you want to continue connecting (yes/no)? yes
Node1 Password will be required
For Node2
Scp /etc/hosts node2:/etc/
Are you sure you want to continue connecting (yes/no)? yes
Node2 Password will be required

Step 3:            

Key Generation Process
ssh-keygen –t dsa
Just press enter on all steps
ssh-keygen –t rsa
Just press enter on all steps
Go on the directory and verify the generated keys files
cd .ssh/
ls –l
Following files has been generated:
id_dsa
id_dsa.pub
id_rsa
id_rsa.pub
known_hosts

Generate authorized_keys in ssh directory
cat *.pub >> authorized_keys

Copy these files on Node1 and Node2
cd ..
For Node1
scp –r .ssh node1:/root/
Node1 Password will be required
For Node2
scp –r .ssh node2:/root/
Node2 Password will be required

Generate Nodes ssh finger prints (Not need for mpiuser)
ssh-keyscan –t dsa masternode node1 node2 > /etc/ssh/ssh_known_hosts
ssh-keyscan –t rsa masternode node1 node2 >> /etc/ssh/ssh_known_hosts
Now you can view the generated file using
less /etc/ssh/ssh_know_hosts

Copy this file on Node1 and Node2, Note that will not ask for the password this time because the public key has already attached or certify on the other side.
scp /etc/ssh/ssh_known_hosts node1:/etc/ssh/
scp /etc/ssh/ssh_known_hosts node2:/etc/ssh/

Now test with login on the other nodes
ssh node1
Run the command on other nodes
ssh node1 uptime 

Step 4:            

Setup NTP service
vi /etc/ntp.conf
disabled the following lines:
#server 0.fedora.pool.ntp.org dynamic
#server 1.fedora.pool.ntp.org dynamic
#server 2.fedora.pool.ntp.org dynamic
enabled the following lines:
server   127.127.1.0                         # local clock
fudge    127.127.1.0         stratum 10
service ntpd restart
shutting down ntpd:                                                       [FAILED]
starting ntpd:                                                                     [OK]

ntpq –p –n

Step 5:            

Installation of PDSH (pdsh-2.18-1.src.rpm)
Recompile it
rpmbuild --rebuild pdsh-2.18-1.src.rpm
change directory
cd /usr/src/redhat/RPMS/i286/
rpm –ivh pdsh-*

vi /etc/machines
masternode
node1
node2

pdsh –a date
pdsh –a ntpq –p –n

Step 6:            

Setup NFS
vi /etc/exports
/cluster ^(rw,no_root_squasn,sync)

service nfs restart
chkconfig --level 35 nfs on
pdsh –a mkdir /cluster
service nfs restart

mount –t nfs masternode:/cluster /cluster/
df –hT

vi /etc/fstab
At the end of this file, add following line:
Masternode:/cluster                      /cluster nfs          defaults               0 0
               

Step 7:            

Creation of ordinary user, and also setup SSH equivalence for that
[group: mpigroup-600, user: mpiuser-600, member of mpigroup, /cluster/mpiuser]
groupadd –g 600 mpigroup
useradd –u 600 –g 600 –d /cluster/mpiuser mpiuser
perform above commands on all nodes

Step 8:            

Installation of prerequisite packages (GCC, G77 etc)
rpm –q gcc
rpm –qa | grep g77
yum list | grep g77
yum –y install compat-gcc-34-g77
pdsh –w node1, node2 yum –y install compat-gcc-34-g77

Step 9:            

Installation of MPI
su – mpiuser
generate ssh keys repeat step-3

Download MPI from (http://www.mcs.anl.gov/research/projects/mpich2/downloads)
Mpich2-1.0.8.tar.gz and copy on cluster directory

Goto on root user and execute the following commands:
chown mpiuser:mpigroup /cluster –R

goto cluster directory using mpiuser
Unzip the following mpi file
tar xzf mpich2-1.0.8.tar.gz
cd mpich2-1.0.8
./configure --prefix=/cluster/mpich2
make
make install

setup some environment variables
Goto Home Directory
cd
vi .bash_profile

PATH=$PATH:$HOME/bin:/cluster/mpich2/bin
LD_LIBRARY_PATH=$LD_LIBRARY_PATH:/cluster/mpich2/lib
export PATH
export LD_LIBRARY_PATH

source .bash_profile
echo $PATH

which mpd
which mpiexec
which mpirun

cat >> /cluster/mpiuser/mpd.hosts << EOF
> masternode
> node1
> node2

vi /cluster/mpiuser/mpd.hosts
remove the masternode and save it

vi /cluster/mpiuser/.mpd.conf
secretword=redhat

mpd &

chmod 0600 /cluster/mpiuser/.mpd.conf

ps aux | grep mpd

mpd &

mpdtrace
mpdtrace –l
mpdallexit
mpdboot –n 2 –chkuponly

mpdboot –n 2
mpdtrace

For checking that your cluster is successfully created run the following example

cd /cluster/mpich2-1.0.8/examples

mpiexec –n 3 ./cpi

how to compile the program of MPI

mpicc –o icpi icpi.c

Now we have successfully created the cluster on CentOS which we have installed in VMware. Now you are able to perform your codes in virtual machines.
I hope you have gained much from this post. Give us feedback and keep visiting Cool Stack.

How to Download Videos from YouTube without any Software

0 comments
YouTube don’t provide the facility of direct download. We have to use a software to download our desired video. The software that we often use is IDM and it’s available only for 30 days trail version. There you have to choose another software after 30 days. 


Now it’s possible to download a video from YouTube without any software by following easy steps;

Step 1
Open the video on YouTube you want to download.

How to Download Videos from YouTube without any Software

Step 2 
Now change the "youtube" from url to "voobys" as you see in the below pictures

How to Download Videos from YouTube without any Software

now see how i changed......

How to Download Videos from YouTube without any Software

Step 3
After "voobys" instead of "youtube", now a window will appear probably you will land on Voobys page. In this page you will see your video with quality options to download. Select the quality option in which you want to download your video. 

How to Download Videos from YouTube without any Software


Step 4 
After selecting an option a window box will appear as follows

How to Download Videos from YouTube without any Software

select the run  option your video will start to download.

Be-careful

Don't click on any other download option in voobys page as 

How to Download Videos from YouTube without any Software

because these are advertisements not the download options.

Now start downloading your desired video from youtube and keep visiting CooL Stack.

How to Install CentOS in VMware Workstation

0 comments
Today I am going to write the method along with snapshots that how we can install a CentOS in VMware. Before going to start the article I think we should have some basic introduction about CentOS and VMware’s.

What is CentOS?

CentOS (Community Enterprise Operating System) is a Linux distribution that attempts to provide a free enterprise class computing platform which has 100% binary compatibility with its upstream source, Red Hat Enterprise Linux (RHEL). As of version 6.4, it officially supports the x86 architecture with Physical Address Extension and the x86-64 architecture, while a beta is expected to be available for PowerPC.

What is VMware?

VMware's are desktop software’s that run on Microsoft Windows, Linux, and Mac OS X. While its enterprise software hypervisors for servers, VMware ESX and VMware ESXi, are bare-metal embedded hypervisors that run directly on server hardware without requiring an additional underlying operating system.

One thing I should mention that I am writing this post by using CentOS 5.5 and VMware Workstation 7.1. Now let’s start the installation.

First you have to download the ISO. After we’ve downloaded the ISO, we need to start VMware Workstation. Go to File – New – Virtual machine (the following window will popup)

Step 1


Choose Typical and click next.

Step 2

Choose I will install the operating system later, and click next.

Step 3

In the Select a Guest operation System window, select Linux and Other Linux 2.6.x kernel 64-bit as Version and click next.

Step 4

In the specify Disk Capacity window select 30 GB for the maximum disk size (although 20 GB will be sufficient also.

Step 5

In the Ready to create virtual machine window click on Customize Hardware.

Step 6

Remove all unnecessary attributes (like the floppy drive), add extra memory to the VM (I gave 1536 MB) and change the Network adapter from NAT to bridged (internal network) and click add to add a extra NIC.

Step 7

Select Network Adapter and click Next

Step 8

In the Network Adapter Type window choose custom and select the NIC which faces to the external network. Click Finish

Step 9

In the Ready to Create Virtual Machine window click customize hardware again

Step 10

Select the CD/DVD drive and connect ISO image file by browsing to the right image. When selected click Advanced.

Step 11

Make sure the legacy emulation is selected and click OK, OK again and finish.

Step 12

The VM will be created, click power on this virtual machine to start the installation process.

Step 13

When the install screen appears press enter.

Step 14

Select Skip and press enter.

Step 15

Click next

Step 16

Select your language and click next

Step 17

Select the appropriate keyboard and click next

Step18

Click Yes to initialize the drive to go on with the installation

Step 19

Select Review and modify partitioning layout and click next.

Step 20

Click Yes (only if you’re sure about it )

Step 21

Make sure / (root) has enough space (20 GB is more then enough) and click next

Step 22

Click Next

Step 23

Make sure both network cards are active on boot and edit them so they are in the right network, also make sure IPv6 is deselected.

Step 24

After editing click OK and after both cards are edited set the Hosname, Gateway and DNS settings and click Next

Step 25

Select the right time zone (region) and click Next

Step 26


Set the Root password and click Next

Step 27
Click Next

Step 28

Click Next to begin the installation

Step 29

After installation click Reboot

Step 30

After Reboot perform the following steps: click Forward

Step 31

Disable the firewall. And click Forward

Step 32


Step 33

Disable the SELinux setting and click Forward

Step 34

Enable the Network Time Protocol and click Forward

Step 35

Create a user and click Forward

Step 36

In the Sound Card window click Forward and in the Additional CDs windows click finish

Step 37

Login to CentOS with the credentials you’ve just created

Step 38

After you’ve logged in a popup shows that Updates are available. Click view Updates

Step 39

Put the Root password in and press enter

Step 40

Click Apply updates

Step 41

After a while click Import key

Step 42

After installation of the updates click Reboot now

Step 43

After reboot log back in and then right click on the VM and press Install VMware Tools

Step 44

Right click the VMware Tools file and click Extract To

Step 45

Select the Extract in folder and click Extract

Step 46

Open a terminal and do a su ( to become root) and enter the Password and press enter

Step 47


Use the cd command to navigate to vmware-tools-distrib folder. Run ./vmware-install.pl to install the vmware tools (you have to enter several times to install)

Step 48


After installation type reboot and press enter to reboot the VM. When the VM is restarted log in to CentOS.

I hope now you can easily install CentOS in WMware workstations. One thing remember that while writing commands be-careful about spaces and case-sensitivity. I have also done some mistakes first time but its my advice to be-careful while typing the commands. I hope you gained some cool stuff from CooL Stack.